Tips: Presentation
When submitting journal skins (Complete CSS or Installable) it's important that your presentation is as best as it can be.
Having place-holder text, such as Lorem ipsum, is a great way to show what your journal skin will look like with paragraphs of text in it. You can generate place-holder text using
this website.
Other than the dummy text, here are some key points you'll need to consider when presenting your CSS submission:
- Legibility: you need to ensure that the text you've used is readable, if you can't read the text in the preview, then you'll need to re-consider the style of text you've used.
- General Features: In your dummy text, use as much html as you can. Bold, italicise, underline, subscript, superscript,
strike, links, etc are things you may want to include, especially if you've stylized them. - Extra Features: People need to know what you're offering them. Make sure you've included every extra feature you've included with the journal skin. If you've styled a blockquote, include it; if you've styled thumbs, include them.
- Live Previews: People WILL want to look at a live preview before they install or download it. After the release of Sta.sh, it's been easier to include live previews, as you don't have to submit a public journal to show them off. It's a great idea to make the live preview BEFORE submitting it, so that you can screenshot it and use it as the deviation preview. To easily screen shot, you can use: Fireshot add-on (Firefox) or Awesome Screenshot: Capture & Annotate (Chrome).
 (Smile)")
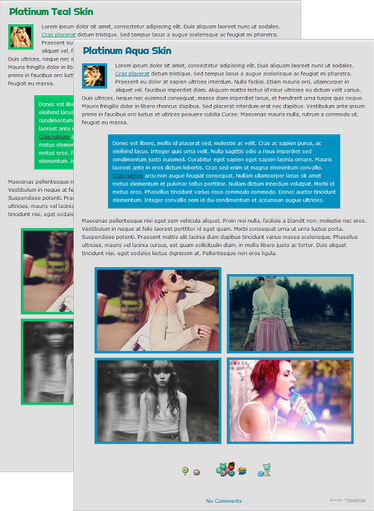
Here are some great examples of well-presented journal skins:


Remember, these points are just tips, and aren't necessary - however, presentation is the key, not just for journal and gallery skins, but for everything you submit on deviantART.

How to: Custom Buttons
With some simple knowledge of CSS you could easily customize your journal skins to your hearts content; with custom buttons and even custom boxes inside your journal skins!
In this tutorial I will show you how to create a custom CSS button and how to use it in your journal skin. I'll explain each piece of code separately so that you know what you are doing and thereby you can also change everything as you like and created new CSS content of your own.
The basic code for a CSS Button:
You can insert this code to the 'CSS' box in the 'Extras' section of the Journal writer.
.button1{
background: #ff768d;
color: #fff;
padding: 8px;
border: 1px solid #db0026;
border-radius: 5px;
font-size: 15px;
text-shadow: 1px 1px #ff2a4d;
text-align:center;
max-height:30px;
max-width: 200px;
cursor: default;
}

.button1:hover {
background: #76d2ff;
border: 1px solid #2ab9ff;
text-shadow: 1px 1px #2ab9ff;
}

.button1:active {
background: #76d2ff;
border: 1px solid #db0026;
text-shadow: 1px 1px #888;
}
How to insert it into your journal?
<div class="button1"> Your Text here </div>
Preview:
Your Text here
What it all means:
 background:
 This states the background color and it has to be a HTML color code (find HTML color codes at www.colorhexa.com)
color: This is the text color and it is also in the form of a HTML color code.
Padding: This is the space you want to leave between the content inside the CSS button and the edge. Has to be stated in Pixels (1px / 5px /...)
border: This is the border, firstly here '1px' states the width of the border, 'solid' is the border style and can be changed to 'dotted' or 'dashed' to get the desired effect, '#000' is once again the HTML color code which states the color of the border.
border-radius: This can be used to state how curved you want the edges of the border to be; if you set it to '0px' then you will have a perfect square and if you set it to '5px' you get curved edges. (can range from 0px - 90px)
font-size: The font size in pixels.
text-shadow: This is the text shadow. The first '1px' states how many pixels to the left the shadow should go. The second '1px' states how much to the bottom the shadow should go. The final color code states the color of the shadow.
text-align: This is the text align (just as the name says): Can be set to either: Left/Right/Center
max-height: & max-width: States the maximum height and width in pixels.
Please note: "Sta.sh has a max-width applied to journals, which is NOT applied on the final deviation; It is 850px. The actual journal will run the whole width unless you limit it inside the CSS."
cursor: This sets the cursor: can be either auto/default/pointer/text/help (full list:
www.w3schools.com/cssref/pr_cl…)
 .button1:hover { }
 This is the hover effect, as in when the cursor is over the button this replaces the original CSS to the values in-between these tags. Such as here it changes the background color, border and text-shadow to a bluish color when the cursor is over the button.
.button1:active { } As same as the hover effect, this code states the CSS which should be used when the button is pressed.
This is only the beginning of what you can do with CSS, but this is also the most essential bit of code. If you are a beginner to CSS learning this code would be most helpful to you when learning CSS further. Hopefully in the next tutorial I write, I will be able to explain how to use images instead of backgrounds and move on to more advanced CSS.
If you have any questions feel free to ask as comments here or send me (
UJz) a note
What would you like to know?
CSS will be difficult when you're unfamiliar to it. So that's why we're writing these articles! If you have any suggestions or would like to write a section in future CSS Did You Know? articles, please note
bradleysays.
If you write a section for us, you will be credited!
Previous editions
Want to learn more about CSS and how to use it? We've collated all of our previous articles and put them into one document for your convenience.
Read the CSS Did You Know? archive
 here
here!